- Alternative process(tbd)
| Files needed: | gtank.ndo, AMain-Metal.jpg. |
| Programs needed: | Nendo (full version), 3D Exploration, Will's VXL Editor, 3ds2vxl. |
Notice: For extra information, see "Intro to voxels". It is also advised to use a 3 button mouse with Nendo or any other 3D program. All tutorials are made so you can do them yourself. Finished products can be downloaded in the download section if needed.
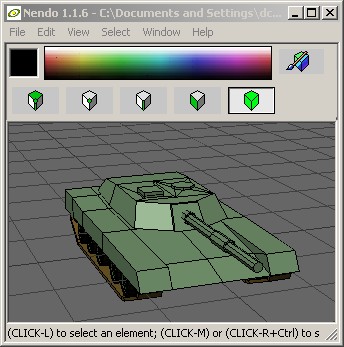
| Step 1: Open gtank.ndo in the Nendo program. |
|
|
Step 2: Choose face colors.
Since the tank already has colored faces, this step can be skipped. However it is important to color them even if you're going to put textures on them because the textures will paint onto the certain color (I'll explain more later).
Step 3: Combine Objects.
|
|
|
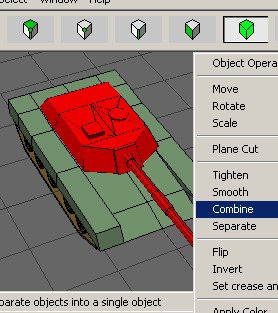
What we are doing now is deleting everything but the turret and the turret base. Remember, in Command Conquer, the turret and the tank are 2 different voxels. This allows the turret to move on it's own in the game without making the whole vehicle have to turn to shoot it's enemy. This is very important.
Delete everything else... and save it as turret.ndo. Go back into gtank.ndo and delete the turret and turret base this time. Save that file as gtank.ndo (gtank.ndo should have the tank base and wheels only-turret.ndo should only have the turret and turret base).
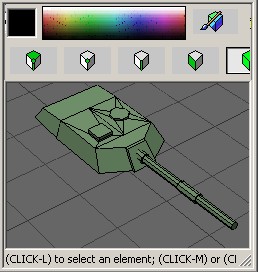
Step 4: Painting
Open turret.ndo. Make sure it has face colors. Press the paint button to go into paint mode. Any face colors are then converted into textured paint. When the file is exported... the textures will be saved as .tif files.
Press the pattern button, choose jpgs as the file type, and choose "AMain-Metal.jpg". Press the fill tool and fill the object will the texture. Rotate the object around and make sure no part are not painted... use the paint brush to touch up.
Step 5: Saving and exporting
When you're finished... click the ready button to go back out of paint mode. Save you file. Now go to export and export it as a .3ds file (This can only be done with the full version of Nendo. If you have the demo... see "alternative process" above.).
Now the turret is done, in the .3ds format, and is ready to be transferred to the .vxl format. We'll do this after we do the body of the object.
Step 6: The tank body
Open gtank.ndo. Repeat the steps above. Paint the body only... not the wheels. Save the file. Export as gtank.3ds.
Step 7: Cleaning up
When Nendo exports to .3ds, it doesn't really do the cleanest job... that's where 3D Exploration comes in. Open 3D Exploration. Open the turret.3ds file. Don't worry if the texture looks like crap... push the render button to see why it looks like crap ( It looks like crap till it's rendered). It will hopefully look like the rendered version when it become a voxel. Go to file and choose save as and save the file as .3ds. 3D Exploration gives you the choice of what the textures should be. Make them .bmp. This helps for conversion. Make sure you keep the new bitmap files with the new .3ds files... 3ds2vxl with look for the bitmaps that are associated with the .3ds file... so don't lose the.
Copy all the bitmaps and .3ds files to the 3ds2vxl folder.
Step 8: Conversion, using 3ds2vxl
Open the 3ds2vxl program (I'm using 3DS2VXL FE.exe in all tutorials). Choose the Source [3ds] which is your gtank.3ds or turret.3ds. We'll do the turret first. Leave the skybox as it is. Set the destination to the 3ds2vxl folder... make sure to name the new file... we'll name it turret.vxl. We'll make the voxel size 100 and the scale 5. Flip X, estimate origin, use smoothing group numbers, use smoothing group angle limits, use materials, use textures. Usually the only thing I need to change is the flipping of x and y or swapping x, y, or z with any of them. It depends on how the file was saved... what angled it was saved at. You want the wheels to be set on the ground and the turret pointing in the right direction. You'll be able to figure this out in the voxel editor later on.
Run the program. It will give a message of the process... and sometimes it will give you a small little 3d view of the finished product in the top left corner. All of that is not important. Just as long as it makes the voxel correctly.
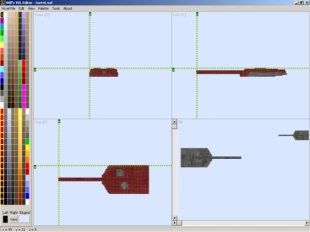
| Step 9: Completion, using Will's voxel editor |
| If you have associated .vxl files with Will's voxel editor, you'll be able to simply double click the finished voxel file to open it directly. If not... open the program and find turret.vxl. |
|
|
| Make sure all the positions are correct and that the turret is pointing left in the left box and that it is not upside down. If it is messed up in any way, it can be corrected in many ways. The voxel editor has flipping tools in it's tools menu. You can also choose to pre-flip it with 3ds2vxl. Also, you could have saved it in the right angle with creating it. This all goes through the trial and error process. No biggy... you just don't want your tank driving backwards in the game. :) |
This process is the same for the tank body also (gtank.3ds). I know it's 10 steps... but once you get the hang of it, it will come to you very fast and will simply become a routine in making voxels.
Now that you have created your voxel, you're going to need a .hva (You need the hvaeditor) for it and you're gonna also want an icon (cameo) for it. I plan to explain both processes. Go back to the main voxel page and follow the links.

Green Tank
Stealth Striker
Psychic Shark